
BenQ SW271C Review
I have been using my BenQ SW271C for over a month now. This has allowed me to properly assess the merits of this new monitor from BenQ. In this review I’ll cover the SW271C’s Colour Accuracy, Uniformity Technology, USB-C and Mac, and BenQ’s new propriety Paper Color Sync. If you are in a rush, the SW271C a worthy development of in the SW PhotoVue range of BenQ colour management monitors and I throughly recommend it. To discover how I reached this conclusion please read on.
My name is Mark Wood, I am a writer and educator and I’ve been working in Graphic Design and Photography for almost thirty-years.
For those of you that don’t know, having a monitor that can be calibrated at the hardware level is essential for photographers and designers who wish to print their work or share their work for others to view on their screens. I’ll be sure to explain esoteric terms such as ‘hardware level calibration’ and ‘profile creation’, and then suggest that the BenQ SW271C is the ideal choice for any creatives who want to fine tune their colour managed workflow.

01: Colour Accuracy
For photographers Colour Management is the art and science of predictably translating environmental colours through digital input devices into reliable, high-fidelity, output. Put another way, most photographers want the following things to happen:
1. To know that the tones and colours they see on location can be reliably captured on their cameras.
2. When reviewing photographs on their computer monitors, the tones and colours reproduced on that monitor are displaying the digital photographs reliably.
Colour Management establishes the workflow from capture through to print, or on-screen display. Over my many years of using BenQ monitors, the good people at BenQ have been making this process evermore reliable; simplifying calibration and profiling. This removes the need for deep specialist knowledge. All at affordable prices.
An essential part of the colour workflow is your monitor. Not only should it be fit for purpose, you will need to tune it up. Monitors need to be calibrated and profiled to give predicable results. From un-boxing to installation the BenQSW271C this process only requires a clear head and an hour or so of your time.
In the next section I’ll take you through the unboxing to installation, including a couple of photographs showing the range of connections the BenQ SW271C has. If you are familiar with BenQ SW Series monitors feel free to skip to section 03.
02: Unboxing And Installing the BenQ SW271C

Figure 01: The BenQ SW271C arrives well protected in cardboard packaging. The first thing you’ll find when opening the box it the factory calibration report. It’s reassuring to see each monitor has passed inspection before shipping.

Figure 02: BenQ remain generous with the cables they ship with their monitors. You should not need to buy any cables to connect the SW 271C to your computer.

Figure 03: On the side of the BenQ SW271C you will find two USB 3.0 downstream connections next to a SD/MMC type card reader, supporting SD/SDHC/SDXC/MMC formats.

Figure 04: On the underside of the SW271C you will find, from left to right above, a service port, the Hotkey Puck port, two HDMI (v2.0) ports, one DisplayPort (v1.4), a USB Type-C (which I am using to connect my MacBookPro to the SW271C), a headphone jack, and finally an Upstream USB 3.0 port.
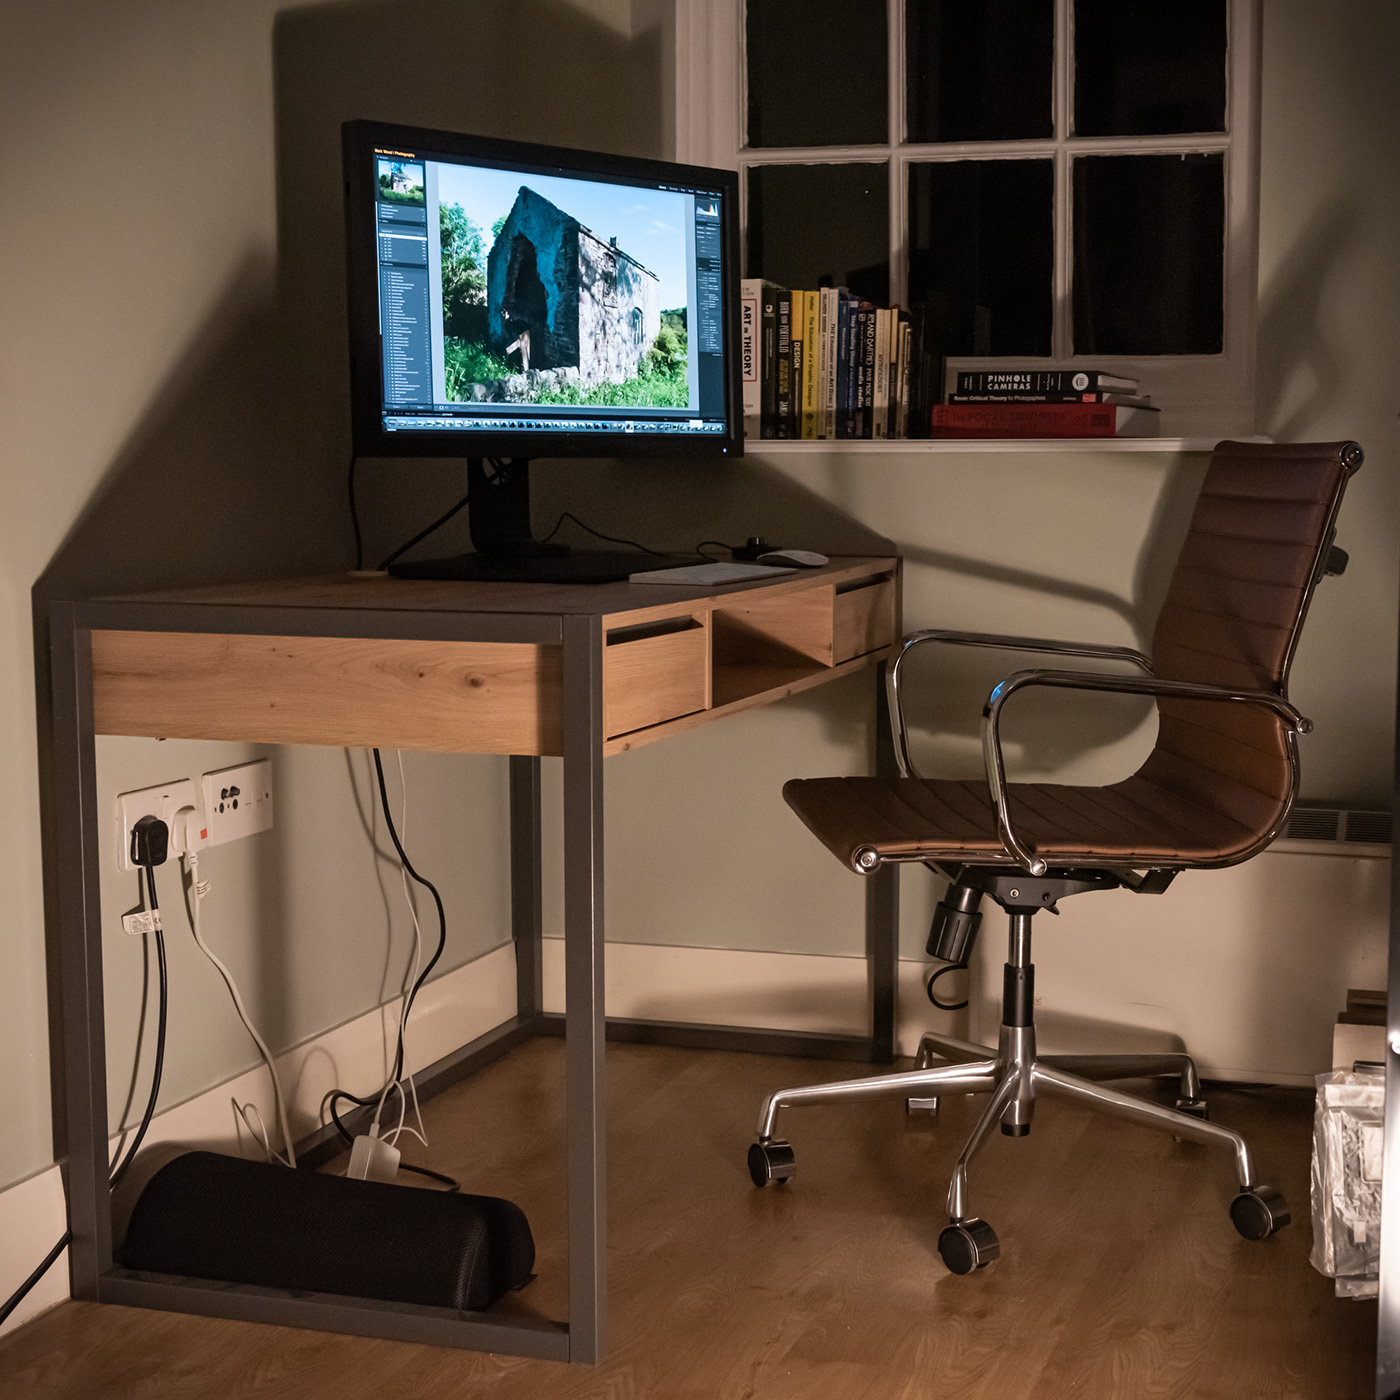
Figure 05: Assembling the monitor stand and attaching the screen requires a little care, but all the parts lock into place securely. I recommend using the wrapping used to package the monitor as a mat to work on whilst locking the parts together.
The photograph above shows the SW271C installed in my Liverpool studio. In the photograph I used directional lighting to cast harsh shadows over my work area for a good reason. Even with a Shading Hood attached, placing monitors next to windows or in the path of other strong light sources should be avoided. The window in the photograph is north facing, that along with the use of blinds helps control the ambient light, making this an ideal spot for the SW271C.

Figure 06: Here is the SW271C with the Shading Hood installed. This helps minimise unwanted light being cast on the screen. Please note BenQ supply the parts necessary to configure the Shading Hood in portrait orientation.
Ambient light is very important. I have processed this photograph twice and then composed the results together. The top left part of Figure 06, above the red dashed line, has been processed to match the colour temperature of the ambient light. The lower right, beneath the red dashed line has been processed to accurately show the colour correction of the monitor. The warmth of ambient light is jarring; it’s too warm when compared to the calibrated SW271C.
Human colour perception is highly adaptive; it subconsciously adjusts for colour temperature changes. Therefore no matter how good a monitor is, and how thorough your calibration, poor quality ambient light will compromise any colour management workflow.
03: Calibrating and Profiling the BenQ SW271C
If you have skipped to this point, by way of a summary, the BenQ SW271C has been assembled and installed in my Liverpool studio. I have considered the position of the monitor and, I know in my case, the proximity of the window will not be a problem. Having control over the ambient light in your digital darkroom is a key part of good colour management.
I am including the following ‘tutorial’ to help you assess the ease of calibration if you choose to buy a BenQ SW271C. The following process describes hardware level calibration; this process tunes the tones and colours of your monitor to deliver reliable and trustworthy results.
Step 01: The SW271C is connected to my MacBookPro using the USB-C cable that shipped with the monitor. I have installed the latest version of BenQ’s Palette Master Element software and plugged my X-Rite i1Display Pro directly into one of the USB 3.0 downstream connections. Also switch off your computer’s screen saver and energy saver options, as you don’t want the monitor to power or the screen saver to come on in mid-calibration.

Step 02: With a colorimeter attached to the SW271C (I am using an X-Rite i1 Display Pro) you launch the BenQ Palette Master Element software. The launch window above indicates, with a green checkmark against the Calibration Device options, that everything is working properly and you can proceed to the next step. Before you click ‘Start’ you just need to decide on whether to run a Basic, or Advanced calibration.
I’ve chosen the Advanced path, as it is still a simple workflow.

Step 03: After tapping Start the next window, called Workflow, offers two options; Profiling or Validation. Select Profiling then tap Next.

Step 04: The next window contains the Display Settings. The default is ‘Photographer (AdobeRGB)’, which is perfect. Using the Advanced workflow allows for more options to be set however, unless you have a good reason to do so I suggest staying with the defaults. My colour management training and writing explains more about the options offered here. Do look out for revised Colour Management tuition material from me scheduled for late 2021. For now, tap Next.

Step 05: In the next window, called Measurement I have configured the Calibration preset 1 to Profile Version v2 and Profile Type Matrix, which is BenQ’s recommendation. The Patch set size has been changed to Large.
Note: The ‘Next’ button is greyed out, the Palette Master Element software requires you to configure your colorimeter; this is revealed when you tap ‘Start Measurement’.

Step 06: After tapping ‘Start Measurement’ in Step 05, the Measurement window illustrates how to configure your colorimeter; the X-Rite i1 Display Pro options are showed above. At this point, if you have not done so already, tip the SW271C back , so that the screen is angled as far from the vertical as the monitor stand allows. With these operations complete tap Continue.

Step 07: The Palette Master Element software illustrates where to place you colorimeter on the screen. With the monitor tilted backwards the colorimeter should stay in position. Make sure this is the case. If your SW271C is on a wobbly desk, don’t wobble the desk! The colorimeter needs to sit on the monitor’s screen securely. Click the Continue button.
The Palette Master Element software will start the calibration. This takes several minutes and at first it might appear like nothing is happening. Over time you will see the monitor dim in steps of grey before displaying primary and other vibrant colours.
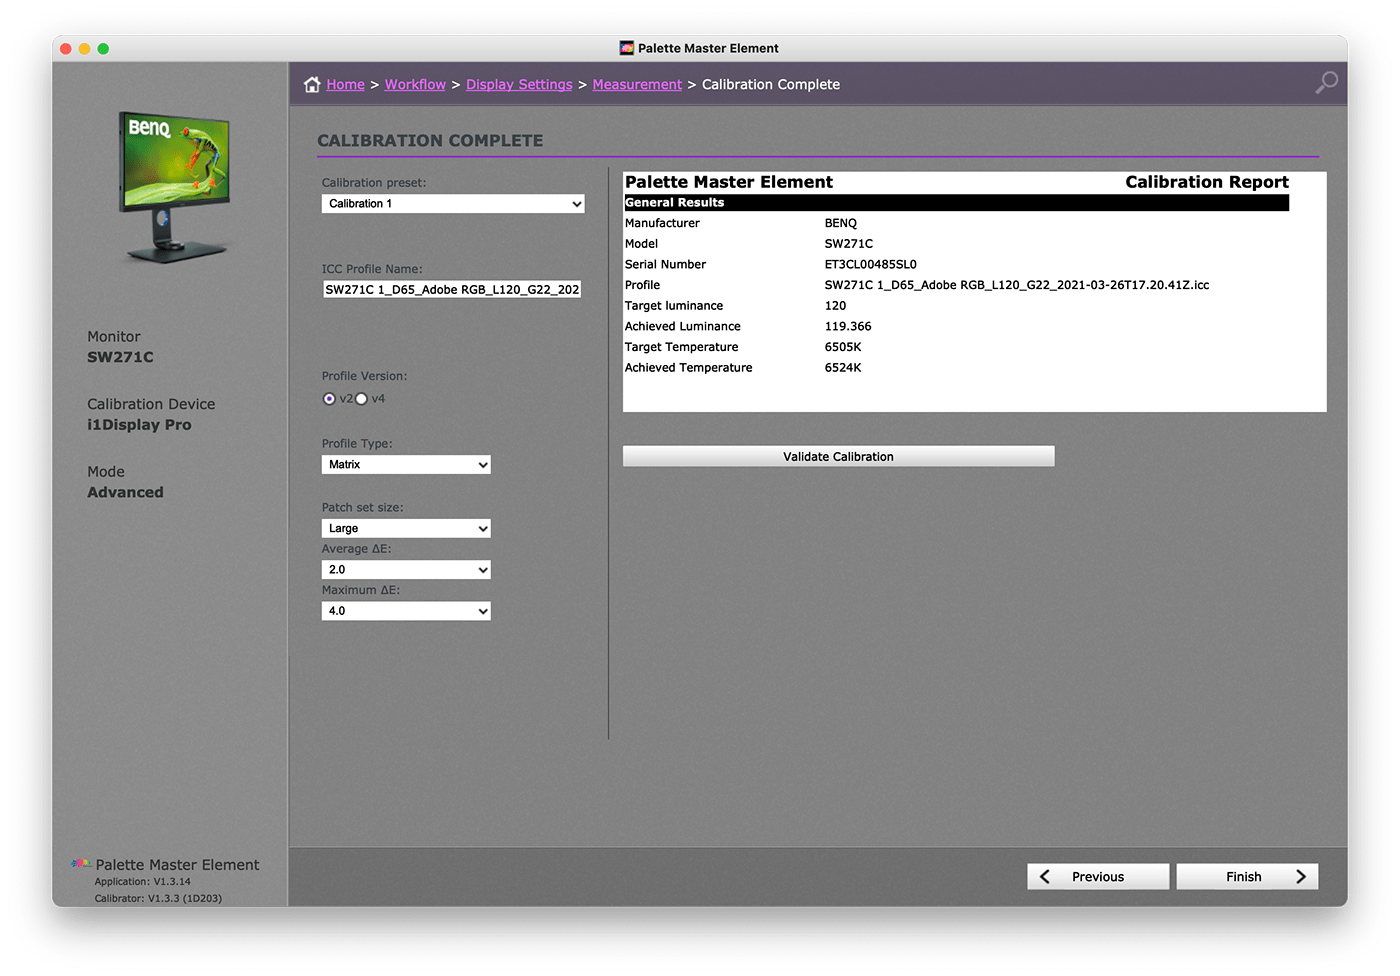
Once the calibration is complete the Palette Master Element software moves to the window below. A colour profile has been created by the Palette Master Element software, this can be automatically accessed by your computer’s operating system; all part of the colour managed workflow people serious about digital imaging require. Apart from tapping Finish to close, the calibration and profiling are done. That’s all you need to do.
In the next part of the review I’ll add a few notes about Uniformity and connecting to an Apple Mac using USB-C.
03: BenQ’s Uniformity Technology
Monitor calibration only measures the tones and colour values of a limited area of a monitor. Monitors that lack Uniformity Technology will display tone and colour in separate sectors of the screen.

Figure 07 (above): This illustration simplifies the uniformity problems some monitors have. Please note the division of the display into nine areas is not figurative. However, Figure 07 does help to illustrate the phenomena of a lack of even-rendering of tone and colour across some monitors; that some parts of the display are too dark, whilst others can be too light.

Figure 08 (above): BenQ’s Uniformity Technology helps ensure that if screen brightness is inconsistent, the calibration process will compensate; bring the non-matching parts of the panel in line. Therefore the whole screen should have uniform tone and colour.
N.B. Figure 08, like Figure 07 is simplistic in dividing the screen area into nine rectangles, but is serves to illustrate the point.
A simple way to assess the uniformity of a monitor is to a) set the desktop pattern to light grey, or otherwise b) fill the monitor’s display area with a light grey. If your computer’s desktop is cluttered with icons go for plan b). If the tone and colour is even across the display area that monitor has good uniformity.
04: The SW271C USB-C Connectivity and Apple Macs
I am driving my BenQ SW271C, from a 2018 MacBookPro, using USB-C. This connectivity comes with 60W power being supplied from the SW271C powering my Mac and therefore freeing up a USB-C on Macs for other peripherals.
A frustration of Macs with USB-C, and therefore not an issue for BenQ, is that when Macs go to ‘Sleep’ the computer wake-up does not always wake the display. The problem can be experienced when connecting via a USB-C hub to other options such as HDMI. The quickest fix is to unplug the USB-C cable at the Mac end and plug it back in. Frustrating as this maybe it is an issue for Apple to resolve.
Testing with non-USB-C Macs using either HDMI or DisplayPort suggests performance is only limited by the computer hardware. So, with the right video card and cables you’ll be able to max-out the performance of the SW271C.
05: A Quick Look At Paper Color Sync
Paper Color Sync is a proprietary technology developed by BenQ. It is designed to work with their Advanced Reflectionless Technology (A.R.T) equipped monitors such as the BenQ SW321C and the SW271C. The software is free to download from the BenQ website but will only work with A.R.T equipped monitors.
One aim of A.R.T is to allow panels to mimic paper-like surfaces. This concept can be extended beyond a generic paper-like quality to creating specific paper simulations on-screen. This is not a new concept, as a Colour Management expert, I am often called on to explain and teach soft-proofing. Soft-proofing lets you preview the potential effect paper and output choices will have on a print, without going to the time and expense of making a print, also known as hard-copy or hard-proof.
The reward for having a BenQ SW calibrated system is that soft-proofing becomes reliable, but setting up soft-proofing is a complicated process. Soft-proofing can be found in several photo applications, including Photoshop and Lightroom.
In order to simplify the process, and to enable users without colour-aware software such as Adobe Photoshop and Lightroom, BenQ had developed Paper Color Sync software to help users colour match their monitors to specific print qualities, on specific papers and printers.
Currently (early 2021) Paper Color Sync only works with a limited number of printers and papers. Overtime the range of papers and printers that Paper Color Sync can process will increase. This is a new technology, and definitely one to watch, as in whatever guise, soft-proofing is vital to successful colour management.
Conclusion
The BenQ SW271C a worthy development in the SW PhotoVue range of BenQ monitors. It incorporates significant improvements in colour management technologies.
Key features include:
• An anti-glare matt panel surface
• Shading Hood, configurable to either landscape or portrait
• Adobe RGB / sRGB / Rec.709 / DCI-P3 Colour Models
• 99% AdobeRGB, 90% P3, 100% sRGB Colour Space Coverage
• 16-bit 3D LUT
• Delta E ≤ 2 in Adobe RGB and sRGB color spaces
• Paper Color Sync Technology
• Revised Uniformity Technology
• USB 3.1. HDMI, and DisplayPort Connectivity
• USB-C connectivity with 60W power supply
Buying a monitor is too often a secondary consideration. We prefer to concentrate on the specification of our computers; photographers might prefer to buy a new lens or camera. However, compare the proven, tested, feature set of the BenQ SW271C against the competitors, and note the pricing and the quality the BenQ offers afford. If you are serious about digital imaging and photography take a good look at the BenQ SW271C.